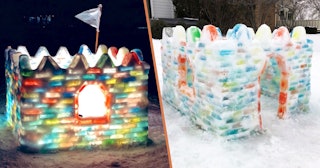
Your 10-Step Guide To Making The World's Most Epic Snow Fort

It’s that part of winter when the days stretch out like stale bubble gum, flavorless and grey. The holidays are over. School drags on.
That’s when you, the coolest parent on the planet, step in to help your kids build the most epic, unforgettable, impossibly beautiful snow fort ever. It won’t be easy, nor will it be fast. Expect frustration, sore muscles, and the occasional broken ice block. And then, when you’ve finished, expect to take a seat at your rightful throne as the ruler of all awesome winter projects.
Supplies
– Tupperware containers and/or empty plastic food containers
– 1 box of non-toxic food coloring
– Whisk
– Large bucket and or plastic sled
– Snow
– Waterproof gloves and other cold-weather gear
– Optional: extension cord and outdoor lights
Step 1. Live somewhere uncomfortably cold. The colder the better.
Step 2. Spend all your time at home, avoiding the social gatherings you used to cherish, and growing increasingly stir crazy. You’ll need to be desperately bored for this project to seem at all appealing.
Step 3. Maintain a career that lends itself to spectacular procrastination. In my own experience, being a writer mid-novel works very well.
Step 4. Gather all your Tupperware. If you feel extra motivated, buy a pack or three of Costco plastic takeout containers with lids.
Step 5. Add a couple of drops of non-toxic food coloring to each container, then fill it up with water. Whisk till the color is dissolved.
Courtesy of Rebecca Siegel
Step 6. Carry the container outside, making sure to slosh the vibrant liquid down your pajama pants. Set it somewhere flat. If it’s snowing, put the lid on. When your neighbor gives you a weird look, just wave. It’s fine.
Repeat steps 5 and 6 until you’ve used all your Tupperware. Encourage your children to help, then watch as they, too, soak their clothes in reds and blues and yellows. Embrace it. Life is chaos.
Step 7. Wait. Depending on your area’s temperatures, it will take a day or two for the ice to freeze. (If you have room in your freezer, jam some in there, too.)
Step 8. Submerge the bottom of each container in a tub of warm water, then pop the block out and store it in a shady outdoor place with the others.
Repeat steps 5-8 approximately a billion times. You need a mound of ice blocks. A mountain. A technicolored Mount Everest. For our castle, we used 475 blocks. Please see the above notes about ideal careers and lack of social activity.
Step 9. This is it! Time to build! Haul your whole family outside and make sure that everyone is wearing waterproof everything. And I mean everything. This part is very fun and very messy.
Make a mix of snow and water for your “mortar.” We do this by filling a plastic sled with snow, then dumping cold water into it and mixing it with our gloved hands.
Courtesy of Rebecca Siegel
Step 10. Layer your beautiful ice blocks with “mortar” to build any shape you want. After you’ve laid a row of blocks, use your hands to smear some extra “mortar” over them to help glue them into place. Stagger your blocks as you lay them to increase your structure’s stability and awesome appearance.
Optional: leave a little hole for an extension cord and illuminate your creation with outdoor-friendly lights. Invite your neighbors to stand at the edge of your yard for a very awkward, socially-distanced lighting ceremony and play Olympic Fanfare for the big moment.
Enjoy. You’re the coolest.