The ‘Ruler Method’ Of DIY Abstract Art Is Simple & Amazing

For the longest time, I didn’t believe I was an artist. I’d try to paint and get so frustrated with myself because nothing came out the way I wanted it to. I couldn’t fight the urge though. I’d keep trying and trying without getting the results I wanted and everything would end up in the recycling bin.
My roommate in college was an art major and I loved watching her paint. She could create the most beautiful flower paintings on canvas and I loved how they were lighter, abstract, and you never had to look really close to see if it was a picture or a painting. They had texture and life, which I love.
About ten years ago, I was looking at a magazine and there was the most beautiful abstract painting I’d ever seen. It was literally just different colors of paint strokes and I started to believe I could actually paint something I’d want to hang in my house. I sent my friend a picture of it and she told me to just sit down and try it. “Remember, it’s paint,” she said. “You can just paint over it if you don’t like it.
It looked simple enough so I went to the craft store, got a canvas and a few different colors of inexpensive, acrylic paint and went home and got to work. To my surprise, it wasn’t that bad. It’s been hanging in my bathroom ever since.
What I didn’t realize was how therapeutic it was to move paint around on a canvas. It made me feel calm and relaxed. I started doing more paintings and have even sold quite a few — all the while feeling like I had to add in that I wasn’t really an artist, which is dumb. If you make something, anything, you are an artist and you should never talk yourself down to yourself or anyone else.
Through the years, I’ve tried different techniques that don’t involve any paint brushes — my favorite being this ruler method.
So, if you’ve always wanted to paint and keep telling yourself you won’t be able to make anything of value, stop that right now.
Gather your favorite colors of acrylic paint, a canvas (or any paintable surface) a ruler, a drop cloth if you’d like (sometimes I use one and sometimes I don’t), and let’s get to it.
Cut your material to size
Katie Bingham-Smith
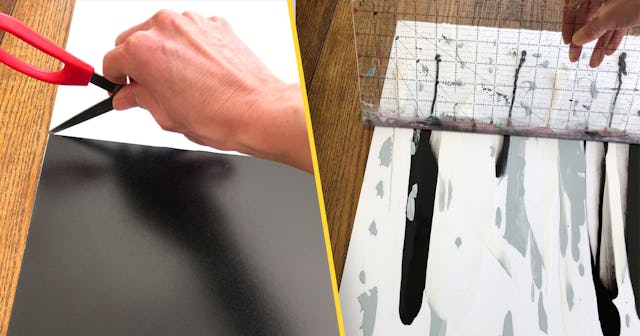
Before we get into the painting, I want to share this tip if you’d like to frame your work: Make sure you cut your paper or poster board to the size of your frame before you start painting. I do this by using the backing of the frame settled in one corner, then I use my scissors as a knife. Just be careful your hands don’t slip. Don’t worry about making this look perfect, especially if your frame has a matte. The imperfections won’t be noticed once your work is framed.
Katie Bingham-Smith
Start painting
Next, make lines going down your paper with the colors of your choice. I like to use a lot of white in my paintings because the darker colors really do take over. If you want some separation between them, you can either use a lot of white or ivory shades, or use the white canvas as your white lines and omit the white all together. I personally like the blending of colors but it’s up to you — this is your art.
Katie Bingham-Smith
Now comes the fun part: Take your ruler and line it up with the top or bottom of your painting; it doesn’t matter which direction you go in. Slide it gently across the entire length of your canvas, then back the other way.
Katie Bingham-Smith
I like to go as gently as possible. You can literally feel your paint moving your ruler around a little bit. I love this because you end up with some pretty awesome surprises, like this line of hearts I found.
Katie Bingham-Smith
You can spread your paint a little harder if you only want lines that look a bit more uniform — like I said, this is your work and it can be tailored to what you want and enjoy doing.
Keep going over it until you get the look you want. Don’t be afraid to add more paint after you’ve swiped across it a few times.
You can also take your ruler and glide it across a certain area of your painting if you want more of a blended look. For smaller areas, I also like to use a frosting knife or even a credit card will work.
Let it dry and frame your work, or hang the canvas on the wall.
This is the finished product hanging in my kids’ bathroom.
Katie Bingham-Smith
And here is a larger one I made using a canvas. This one was really satisfying to make and I had to use a drop cloth because of the amount of paint I was using. It tends to drop off the edges if your want your lines going all the way down the canvas, so keep that in mind.
This project is easy enough to do with your kids if you want, and is perfect for a girls’ night activity — I’ve done this a few times with my girlfriends over Zoom since the pandemic and it’s a great thing to look forward to.
The best thing about this though? It’s so simple, doesn’t take a lot of time or money, and will make you feel so proud of yourself. Before you know it, you will have a painting in every room like I do.
This article was originally published on